Integrate a keypad into your arduino project.
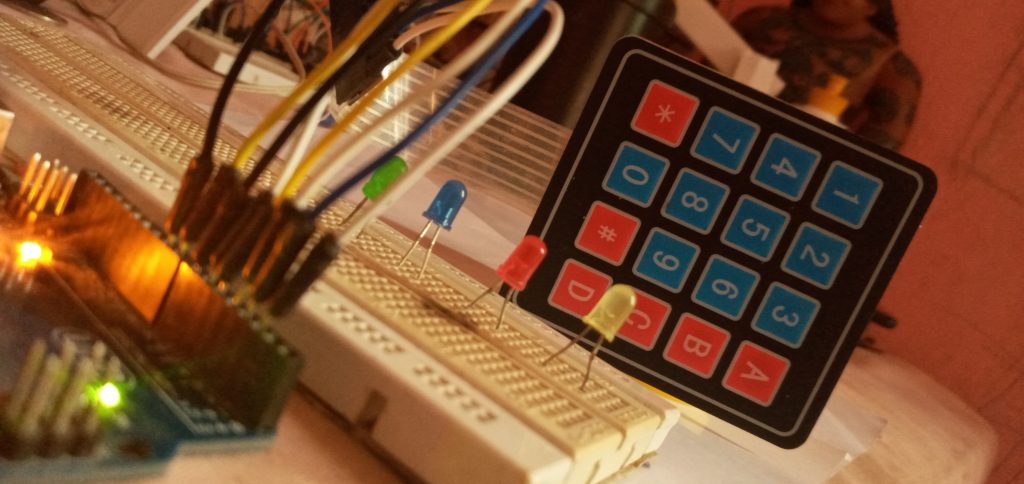
Systems that allow users to input their own data or in a way allow the users to control them by keypads or buttons are weirdly unique, yeah! They give the user some kind of feeling that makes the user feel like, “oh wow am in control”. The few who were with us a couple of years back when we were using the Nokia 3310 and co would appreciate this tutorial more, hahaa. 
So in this pretty short tutorial we are going to learn how to integrate a keybpad with our microcontroller and perhaps build something fun at the end.
The keyboard I will be using in this tutorial is a 4X4 matrix keyboard and i will explain why 4×4 soon. But of course the tutorial will generally let you understand how to use any keypad, whethere 4×3 or any custom keypad you may find yourself using. The Basis are the same!
why 4x4 and 4x3 and etc...?
 If you have used excel or any spread sheet before you’d realize that the best way to identify individual cells in a grid is to use the rows and columns approach.
So in a grid with 16 boxes inside of it like this one, you will identify the highlighted box or cell with what row and column it is located in. It is the same with key pads too.
The individual buttons are arranged in rows and columns. So every keypad is named by its maximum dimensions. The max number of rows here is 4 and the max columns are also 4 so it is a 4×4 matrix keypad.
Note that the rows are the numbers and the columns are the letters. in this one.
The electronic rows and columns behind the keypad.
So yes, behind the keypad there are wires that run through. In the case of the 4×4 keypads there are a total of 8 different wires that run through it. 4 for each row and the next 4 for each column.  Whenever a particular button is pressed, it means a prticular row and a particular column have come in contact. It is the job of the microcontroller to figure out “which row and which column have come in contact?” and hence, “which button has been pressed?”.
There is a unique way the microcontroller identifies this but I dont want to get you bored in this particular piece. Maybe I’ll dedicate that for another day. There is a simple library called “Keypad.h” we will use in the arduino program that will take care of all the booring technicalities and make it easy for you to use any keypad. But wait lets build the circuit!
A simple password protected System
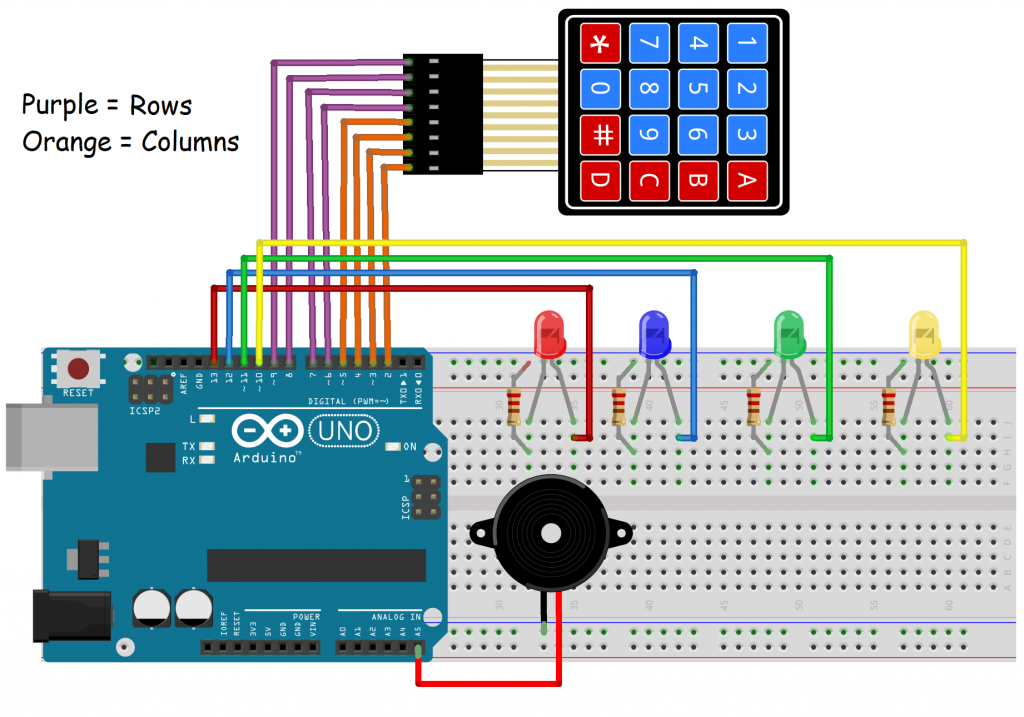
So in this simple but interesiting project I want you to imaging something, I want you to imagine a great posibility. Let say you have a big project or system that has to function only if the main user is in charge. Just like how you sometimes put passwords on your mobile phone to prevent others from accessing it. So in this proect the 4 beautiful LEDs you see there represent something precious you have built, but then, these 4 LEDs are going to display their beauty to the user only after the right password has been entered. It’s crazy, I know right!
Watch this video to see the sample in operation!
Components involved
- Bread board
- Arduino UNO board
- 4 LEDs(Red, yellow, green, blue)
- 4×4 keypad matrix
- Piezoelectric buzzer
- A few jumper wires
What the codes will do to the circuit
And yes the codes below are what will be uploaded to your Arduino microcontroller in other for it to run sensibly. The codes have been commented well enough to explain things incase you are not comfortable with some of them.
The Codes
					#include <Keypad.h>//download the keypad library from your library manager of from the arduino site
#define password_length 8

int RedLed = 13;
int BlueLed = 12;
int GreenLed = 11;
int YellowLed = 10;
int buzzer = A5;

//the few declarations below are needed by the Keypad library to function.
const byte ROWS = 4;//rows of your keypad
const byte COLS = 4;//rows of your columns
char hexaKeys[ROWS][COLS] = {
  {'1', '2', '3', 'A'},
  {'4', '5', '6', 'B'},
  {'7', '8', '9', 'C'},
  {'*', '0', '#', 'D'}
};
byte rowPins[ROWS] = {9, 8, 7, 6};
byte colPins[COLS] = {5, 4, 3, 2};
Keypad customKeypad = Keypad(makeKeymap(hexaKeys), rowPins, colPins, ROWS, COLS);


int count_userdata = 0;//this variable will be used to count the number of characters a user inputs
char userdata[password_length];//this array will store the user's input
char master_password[password_length] = "9876543";//this is the password the user has to match up


void setup() {
  Serial.begin(9600);
  //this for loop sets the modes of pins 10 to 13 as outputs. The LEDs are connected there
  for (int a = 10; a <= 13; a++) {
    pinMode(a, OUTPUT);
  }
  pinMode(buzzer, OUTPUT);//the buzzer is also an OUTPUT component
  Serial.println("Hello there, type your password to control the system");
}


void loop() {
  char customKey = customKeypad.getKey();
  if (customKey) {
    Serial.println(customKey);
    userdata[count_userdata] = customKey;
    count_userdata++;
  }

  if (count_userdata == password_length - 1) {
    if (!strcmp(userdata, master_password)) {
      Serial.println("access granted");
      delay(1000);
      Serial.println("LEDs about to dance");
      delay(1000);
      danceLED();
    }
    else {
      Serial.println("Access Deied, try again");
      digitalWrite(buzzer, HIGH);
      delay(500);
      digitalWrite(buzzer, LOW);
      delay(500);
    }

    clearData();//this function is called to clear the data the user previously inputed
  }
}

void clearData() {
  while (count_userdata != 0) {
    userdata[count_userdata--] = 0;
  }
  return;
}


void danceLED() {
  //this is the function that is called when the user succesfully types the right password
  //you can replace it with your own project.
  Serial.println("The LEDs are dancing");
  int p = 10;//this is the number of times the LEDs should dance.
  while (p != 0) {
    for (int i = 13; i >= 10; i--) {
      digitalWrite(i, HIGH);
      delay(150);
    }
    for (int i = 13; i >= 10; i--) {
      digitalWrite(i, LOW);
      delay(150);
    }
    //delay(100);
    for (int i = 10; i <= 13; i++) {
      digitalWrite(i, HIGH);
      delay(150);
    }
    for (int i = 10; i <= 13; i++) {
      digitalWrite(i, LOW);
      delay(150);
    }
    p--;
  }
  Serial.println("LEDs are done dancings, input the password again to see it");
}
What this program does is this.
On the Serial monitor, the program will begin by requesting the user to input the password.
If the password is wrong, the buzzer will make that annoying sound to prompt you.
But if the password is right, the LEDs will show you the beautiful dance they have you.
It’s that simple.
Important
#define password_length 8
This is what defines the lenght of the master password. The value here should always be 1 more that the actual lenght since all strings have an invisible null character at their end. So if your password is 10 characters, this value should be 11.
clearData();//this function is called to clear the data the user previously inputed
This fuction is only responsible for deleting the previous data the user put in after every cycle.
					void danceLED() {
}
The danceLED(); function is the main function tht holds whatever project protected behind the password so feel free to change the code in it to suit your needs.
Alright genius! This is it for today too. Go be you! and yeah dont forget to leave a question, suggestion, or anything in the big comment section below. Do well to also post pictures of your projects in the community.



The code on this page is gone 🙁
Can you please reupload the code
Hello lee,
Thank you pointing that out, the codes have been uploaded now.
Have a wonderful time!
Thank you for sharing with us
That’s a very interesting project… Kudus