Motion detection with the PIR motion sensor.

Why at all would you need to detect motion? And why is the PIR motion sensor a good option? Okay welcome to another quick and wonderful Tutorial. In this Tutorial we are going to look at Motion detection and how we can Integerate the PIR Motion sensor into our various projects to create cool stuff! Lets go!
What is motion dection?
Okay so wikipedia says “Motion detection is the process of detecting the change in the posiotion of an object realitve to the surroundings or the change in surroundings realative to an object”. Basically and popularly for security reasons, motion detection is adopted in both industrial and domestic machines and systems to detec the movement of people and animals in a place.
For example, in some workplaces there are motion sensor that are activated in the night to track the movement of unauthorized people and animals.  If no one is supposed to be found in an area for security reasons and the sensor detects your prescence or movement, an alarm is being triggered and a camera around takes wonderful pictures or videos of you and reports you to the security department by the power of IOT(Internet of things).
In these mordern days I would prefer to have more automated systems to take care of security than employ security men who might even end up sleeping throughout the night. Lets take away that burden!
How does a PIR help in motion detection?
There are so many mechanisms used in detecting motion but the use of PIR is one of the common ones. PIR means Passive Infrared. And this method uses Infrared light to detect motion. What passive here means is that, the sensor does not emit any Infrared signals on its own but rather it only reads infrared signals. Let me expand a little on this.
Infrared light cannnot be seen but it is mostly felt in the form of heat. Also every human and animal emit some levels of infrared signatures because of the internal heats we carry. It is these infrared signals in us that make it possible to detect our movement with the use of passive Infrared sensors. It is very important for you to also know that the PIR motion sensor does not detect the amount of IR in the surroundings but can only tell if there has being a change in infared levels or not. Alright you should be pretty cool now, lets continue to build something cool.
The PIR sensor module.
We are going to use this HCSR501 module to build a simple motion detetion system with the Arduino Microcontroller!  The sensor is very simple to hook up because it has only 3 pins to be connected. As labeled on the other surface of the module, two of them are obviously VCC and GND and the pin in the middle is the data pin where we will retrieve our sensor data from.
It would be a good question to ask if the data to be retrieved fom the PIR sensor is a digital or analogue one? Okay it is strictly a digital one! When a change in IR is detected, the pin will go “HIGH” and when nothing is detectecd the pin will go “LOW”. Hence, we will connect that pin to any of the digital pins of the microcontroller(which in my case is an arduino).
Lastly, take note of those two potentiometers on the module. They are very useful when you want to
1) increase or decrease the range/sensitivity at which the sensor operates and should trigger a “HIGH”
2) and the delay timer potentiometer is used to vary how long the module should keep reporting a “HIGH” to the controller once it detects something.

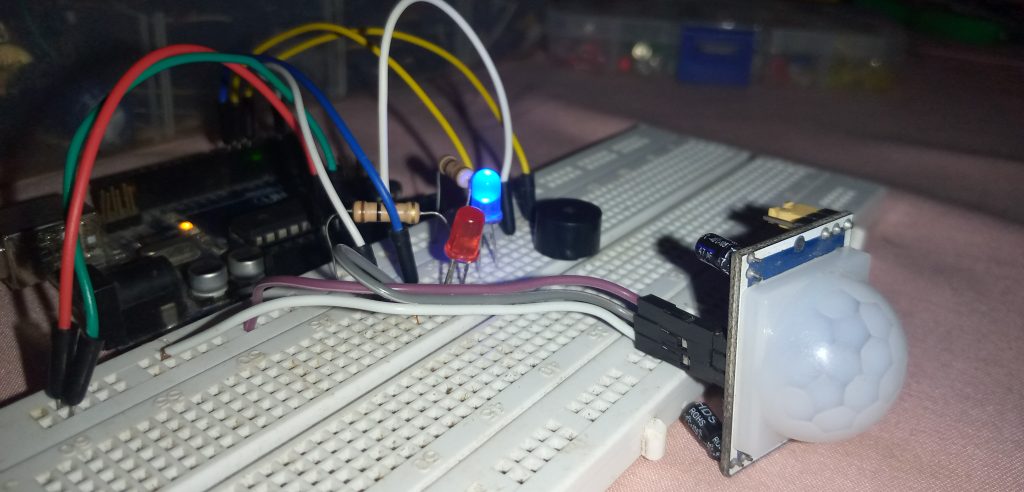
This simple circuit is the game of the day.
- Arduino UNO
- PIR motion sensor
- 2 LEDs(dont forget the resistors before grounding them tho)
- 1 piezo electric buzzer
 Whenever our PIR detects motion(thus when we digitalRead() a “HIGH” on the data pin) the microcontroller is going to command the LED to keep blinking for sometime and at the same time the piezoelectric buzzer will also keep on beeping for some time.
 However, when the sensor settles and there is no movement detected(thus when digitalRead() returns a “LOW” , the microcontroller will keep the blue LED on).
I think this is a pretty cool project you can build in a few minutes.
And of course here are the codes for the project too!
Try and understand theses simple codes very well so that you can manipulate the whole thing to suit whatever awesome project you want to build for the world tomorrow.
And dont forget, if you have any question or want help with anything here, there is a biiiiig comment box below just for you. Ask your question and the whole community will be here to help you!
If you have any awesome projects you want to share with the whole tech community, you can post pics, articles or videos of your project on your community line here!
Build your dream and lets do this revolution thing together! Stay blessed!


Great work
🤜
more fire
thank you very much
I really appreciate that
You are very welcome sir.
More awesome stuff to come!
Stay connected!
I really needed this video
Thank you very much
You welcome charles. More are to come!
Wonderful tutorials……it has helped me a lot
Haha am Glad it did!